
🎯 Objective

-
Understand the concepts and usage of
Ansible. -
Integrate Ansible to the existing
CI/CDpipeline to improve the continuous delivery of our application. Thus, our CI/CD pipeline will be robust and smooth for continuous delivery even for the complex setup of multiple target systems.

🧭 The setup of the CI/CD pipeline for this week
So far, we have used Jenkins as a Continuous Integration and Continuous Deployment tool.
However, Jenkins works best as a Continuous Integration only as it has problems dealing with more complex set up of multiple target deployment environments of servers.
➜ So we need to introduce Ansible, which is a Configuration Management tool, which is the best practice of handling updates and changes of target system requirements.
So here is the setup for our CI/CD pipeline this week:
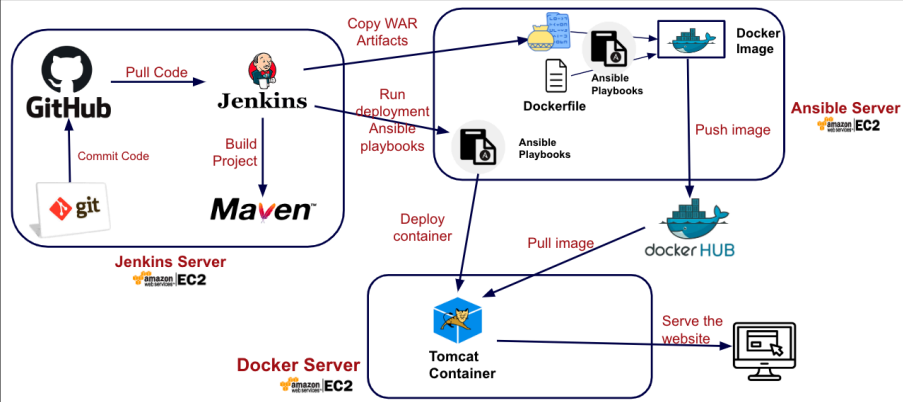
Note: To proceed with the lab, we should have already set up our Jenkins Server and Docker Server in the previous lab. If you do not have the Jenkins Server or Docker Server (because you have already deleted those EC2 instances) then please try to set them up again by following the tutorial instructions in previous weeks.
Let's create a new EC2 server to be our Ansible Server.
🖥️ 1. Setup the Ansible server
The outline for this section:
-
Setup a Linux
EC2instance “Ansible_Server”. -
Setup hostname for convenience (as we have many servers to manage now).
-
Create
ansibleadminuser. -
Add the user to sudoers file.
-
Generate
SSHkeys to a quick authenticate (for theAnsibleserver to communicate/controlDockerServer). -
Enable password based login.
-
Authorise the Jenkins server's public key for the
ansibleadminuser (so Jenkins can reach this server with the SSH Agent plugin). -
Install ansible.
☁️ 1a. Create the Ansible Server on EC2
Let’s setup the EC2 instance for “Ansible” Server like so:

-
Here are the settings of the
DockerServer for EC2:-
Name:
Ansible_Server -
OS: default Amazon Linux 2023 AMI
-
Instance Type: t3.micro (Free-tier)
-
Key pair: select and reuse your old key in other labs (
devops_project_key) -
Storage: Default 8 GB is plenty enough!
-
Security Group:
-
Optional Name:
Ansible_Security_Group -
Source Type: Anywhere
-
Open two ports:
-
22 for
SSH -
8080-8090 (as we might want to create/test some docker images)
-
-
-
-
After launching the instance then, in the EC2 dashboard you should see the
Ansible_ServerEC2 running:

We need these above EC2 instances for our pipeline in this lab!
-
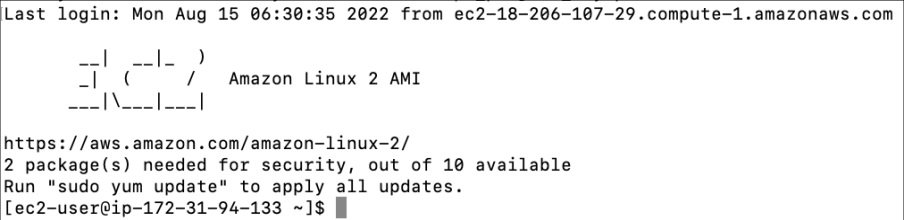
After that, let’s SSH to the Ansible Server on EC2:
⚙️ 1b. Setup configuration before installing Ansible on EC2
-
To keep things simple without dealing with permission, let’s login as a
rootuser and change our current directory to/root:
sudo su --
Now, you are now a
rootuser with the highest permission privilege to install anything you want. You can check your current directory, which should tell you that you are atrootdirectory:

-
Everytime, we login to an
EC2server, we can only see the private public address as a host name (server name) of the EC2 which could be confusing when we need to login multiple different EC2 servers (likeJenkinsserver,Ansibleserver,Dockerserver).

-
Let's change the hostname of each EC2 server so next time, when we login into that EC2 server, there will be no confusion about which server we are currently login to.
nano /etc/hostname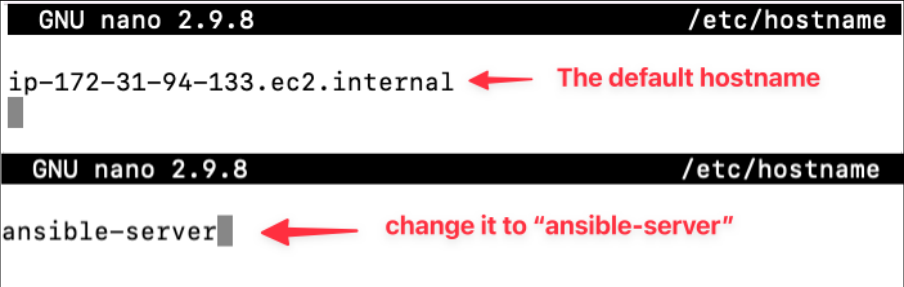
-
Save the hostname file and reboot the server by typing “reboot”:
reboot
-
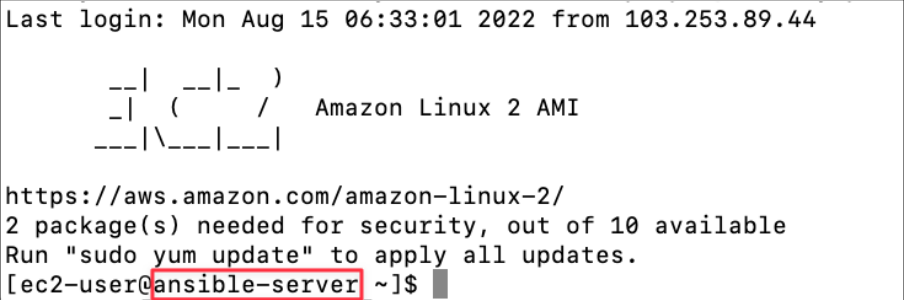
Now, wait for a few minutes and let's
SSHinto theAnsible_Serveragain then you will see the hostname has changed like so:
From now on, whenever you work on a new server, please take your time to change the hostname so it's easier to check if you have SSH into the correct server.
-
Alright, let’s login as a
rootuser and change our current directory to/root:
sudo su --
Let's create a new user “
ansibleadmin”:
useradd ansibleadmin-
Let's add a password for that new user “
ansibleadmin”:
passwd ansibleadmin
-
Alright, to keep things simple, we want the
ansibleadminuser to be able to execute any command without password so let’s grant the user sudo privileges by editing Sudoers file and save the file. This file defines which users have sudo privileges and the level of access they have:
nano /etc/sudoers-
Locate the section in the file where it mentions configurations for users or groups to execute commands without entering a password.

-
Add the following line to grant
ansibleadminpermission to execute all commands as sudo without needing a password:-
ALL=(ALL): Allows
ansibleadminto act as all users and groups. -
NOPASSWD: ALL: Removes the requirement for a password when using sudo.
-
ansibleadmin ALL=(ALL) NOPASSWD: ALL
-
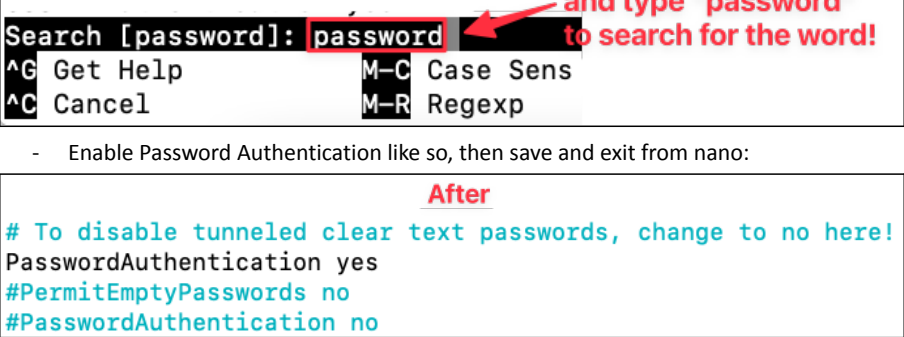
By default,
EC2server will not allow users to login with the password so we need to enable that:
nano /etc/ssh/sshd_config
-
Enable Password Authentication like so, then save and exit from nano:
-
Alright, let’s restart the ssh service for our change to take effective:
service sshd reload-
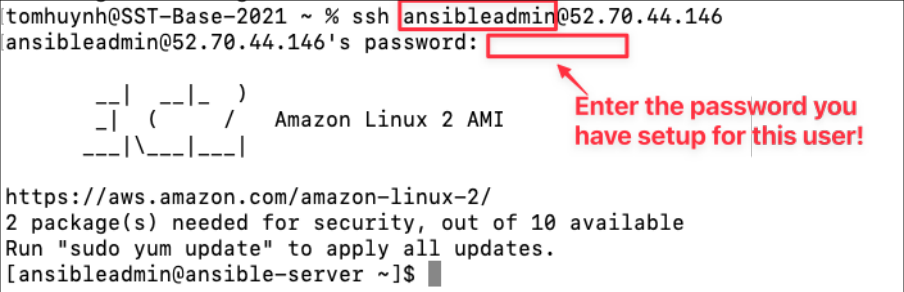
Now, please exit to be back to your own laptop terminal and open a new terminal to SSH into the Ansible Server as
ansibleadminuser with the password:
-
Now, let's generate SSH keys for authentication for this
ansibleadminuser:
ssh-keygen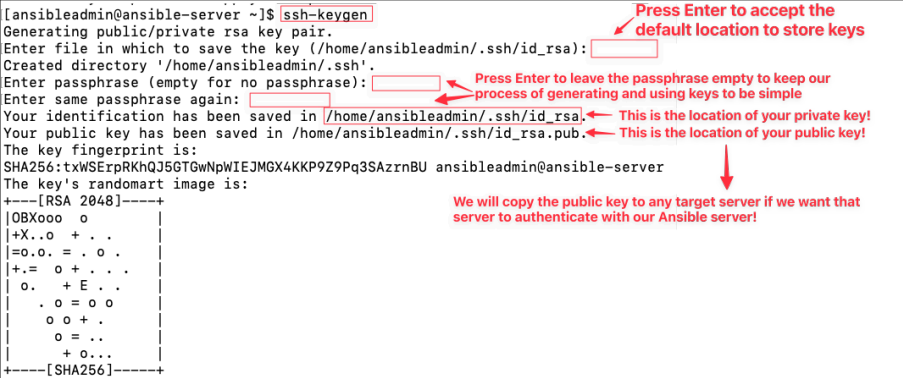
📦 1c. Install Ansible on EC2
Now, we are ready to install Ansible on this server!
-
Alright, let’s login as a
rootuser and change our current directory to/root:
sudo su -
-
For other CentOS servers, to install ansible, we can just run “yum install ansible”. However, this package is not available on
AWSEC2server:
yum install ansible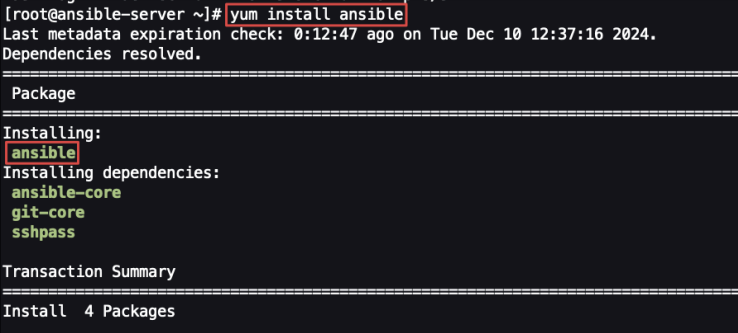
Alright, ansible has been installed now!
-
We can double check by checking the version of ansible:
ansible --version
As you can see, ansible is built on the top of python so that's why you see the python version there as well!
🐳 2. Manage Docker Server with Ansible Server

The outline what you need to do:
Connection checkpoint: Ansible is agentless. What must still be true about SSH connectivity, the remote user, and privilege escalation before a playbook can manage the Docker server?
-
On the docker server:
-
Create
ansibleadmin -
Add
ansibleadminto sudoers files -
Enable password login
-
-
On the ansible server:
-
Add to hosts file.
-
Copy ssh the public key from ansible server to docker server.
-
Test the connection from ansible server to docker server.
-
Let's go!
-
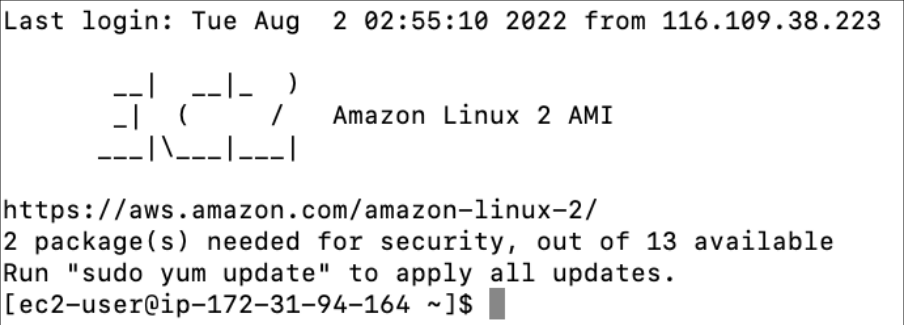
Let's
SSHinto theDockerServer:

-
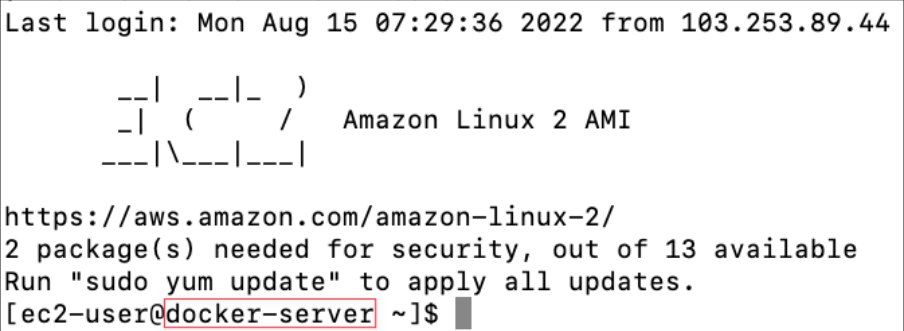
If you have not changed the hostname for the docker server, then please change the hostname of this server to be “
docker-server”, reboot and ssh again:
-
Alright, let’s login as a
rootuser and change our current directory to/root:
sudo su --
Let's create a new user “
ansibleadmin”:
useradd ansibleadmin-
Let's add a password for that new user “
ansibleadmin”:
passwd ansibleadmin
-
Let’s add the
ansibleadminto be in thedockergroup:-
This is necessary to run Docker commands as the
ansibleadminuser without typing sudo every time.
-
sudo usermod -aG docker ansibleadmin-
We can double check if the
ansibleadminis now in thedockergroup:
id ansibleadmin
-
Alright, to keep things simple, I want the
ansibleadminuser to be able to execute any command without password so let's modify Sudoers file and save the file:
nano /etc/sudoers

-
By default,
EC2server will not allow users to login with the password so we need to enable that:
nano /etc/ssh/sshd_config
-
Enable Password Authentication like so, then save and exit from nano:

-
Alright, let’s restart the ssh service for our change to take effective:
service sshd reload-
Nice, let's check the IP address of our Docker Server so we can add the IP address of Docker Server to our
AnsibleInventory in the Ansible Server:-
Keep in mind that, the highlighted is the private IP address so only EC2 within the same network will be able to communicate with it.
-
ifconfig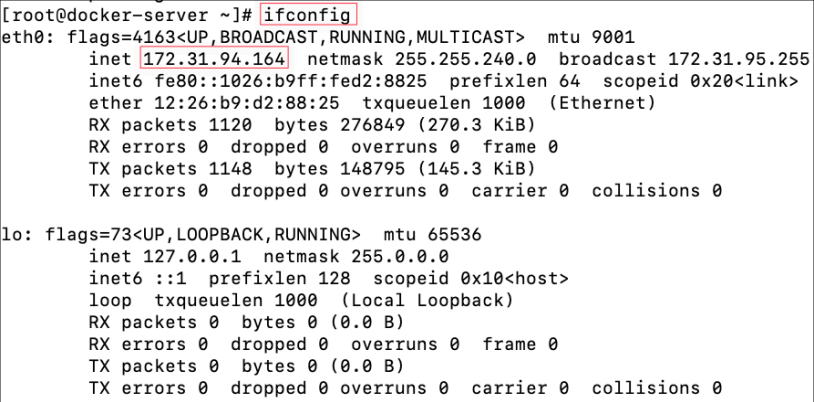
-
[Switch to Ansible Server Terminal] Now, let's switch to the terminal that controls Ansible server.
-
The default location for the
inventory file(/etc/ansible/hosts) may vary based on how Ansible was installed. To confirm the location of the default inventory file, check the Ansible configuration:
ansible-config dump | grep DEFAULT_HOST_LIST
The screenshot confirms that the default location of the ansible hosts is indeed at /etc/ansible/hosts
-
Let's modify the Ansible host file (Ansible Inventory):
-
This file is the "address book" of Ansible. Every machine you want Ansible to manage needs to be listed here.
-
nano /etc/ansible/hosts

-
That's good! Let's switch back to the
ansibleadminuser on the Ansible Server:
sudo su - ansibleadmin
-
Let's change the current working directory to
.sshto see our public and private keys:
cd .ssh
ls -la
-
We can inspect further the public key of Ansible Server by printing it out:
cat id_rsa.pub
-
Let's copy the public key of
ansibleadminon the Ansible Server to the Docker Server:-
So the
ansibleadminuser can connect without a password. This sets up passwordless SSH, allowing Ansible to run commands andplaybookson the Docker Server automatically without needing manual password input every time as this is the core of automation.
-
ssh-copy-id [the-ip-address-of-docker-server]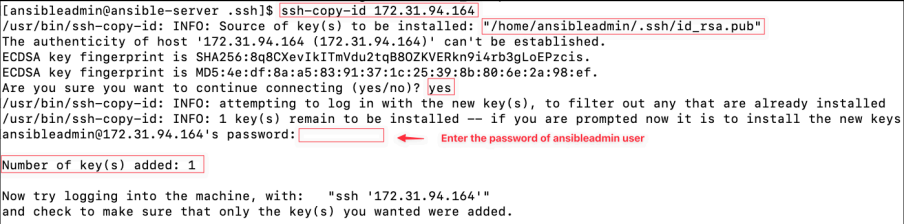
-
[Switch back to Docker Server Terminal] Let's switch back to terminal of Docker Server and check if the public key has been copied over:
-
First, let's change from
roottoansibleadmin:
sudo su - ansibleadmin-
Then, need to change current working directory to
.ssh:
cd .ssh-
Print out the
authorized_keys:-
You should see the same content of the public key of
ansibleadminon the Ansible Server that we copied over in Docker Server.
-
cat authorized_keys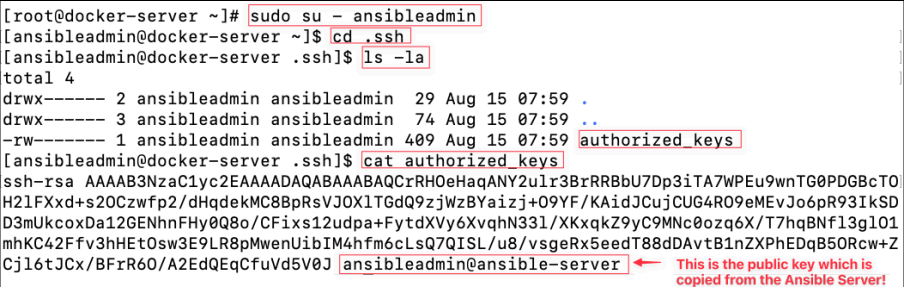
Now, it's time to test the connection between Ansible Server and Docker Server:
-
[Switch back to Ansible Server Terminal] In the Ansible Server, we can use Ansible to ping the target server in the
inventorylike so:
ansible all -m ping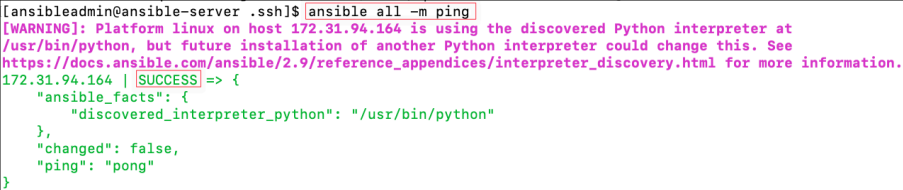
-
Similarly, we can use ansible from Ansible Server to run the bash command like “uptime” on Docker Server like so:
ansible all -m command -a uptime
This is like how Ansible Server (master) can control everything on the Docker Server (slave) with any credentials or password authentication. Image, you can have ten different target servers in the Ansible Inventory file so one Ansible server can control all target servers easily.
Extra Note: you might wonder that while the manual setup of each server (e.g., creating a user, enabling SSH password authentication, etc.) works for a small number of servers, it quickly becomes cumbersome and error-prone when scaling to manage 10, 100, or more target servers. However, in the challenge exercise, you can use Ansible itself to automate the onboarding of new target servers (slaves) to make the process repeatable and scalable.
🔗 3. Integrate Ansible with Jenkins

-
Let's
SSHinto theJenkinsServer:

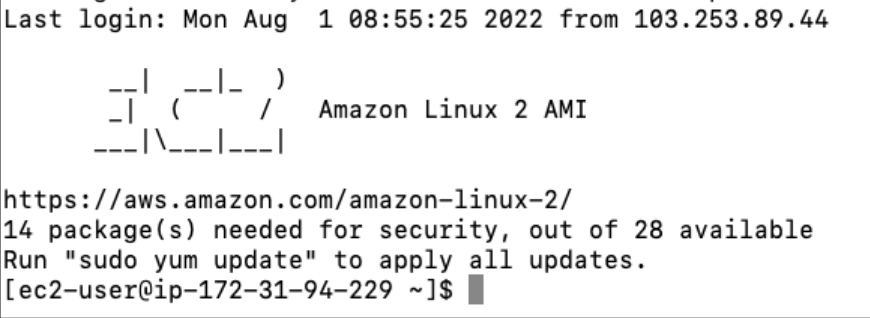
-
In case you have not changed the hostname of Jenkins server, let’s change the hostname of this server to be “
jenkins-server”, reboot and ssh again:
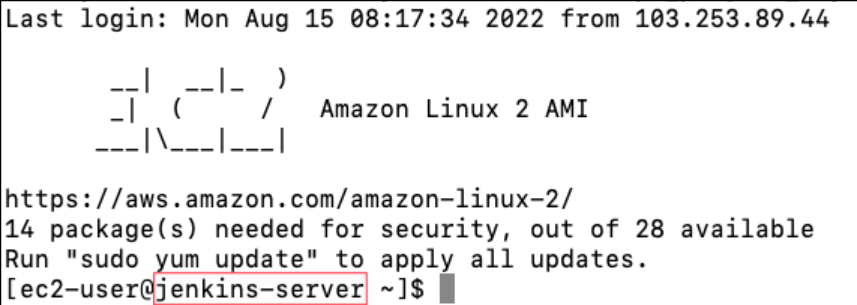
-
Alright, let’s login as a
rootuser and change our current directory to/root:
sudo su --
Let’s start Jenkins service if you need to:
service jenkins start
-
[On the Jenkins server, as root] Authorise the existing Jenkins key on the Ansible server. You are reusing the key pair you generated in the Docker lab so do not generate a new one.
-
First confirm the key is still there (it was created as
/root/jenkins_deploy_keyin the Docker lab):ls -l /root/jenkins_deploy_key /root/jenkins_deploy_key.pub-
[Only missing] If those two files are missing (for example you rebuilt the Jenkins server), re-create the pair and re-authorise it on the Docker server exactly as you did in the Docker lab before continuing:
ssh-keygen -t rsa -b 4096 -m PEM -f /root/jenkins_deploy_key -N ""
ssh-copy-id -i /root/jenkins_deploy_key.pub dockeradmin@<Docker-Server-Private-IP>
-
-
Now authorise the same public key for
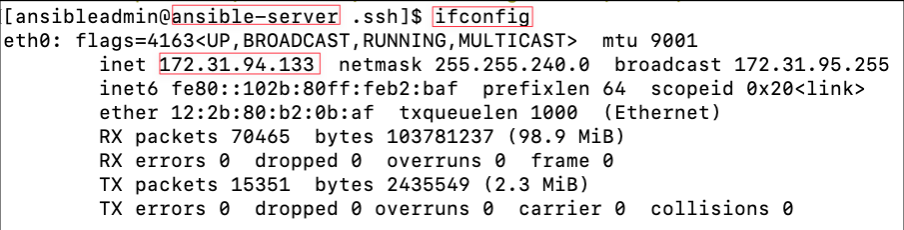
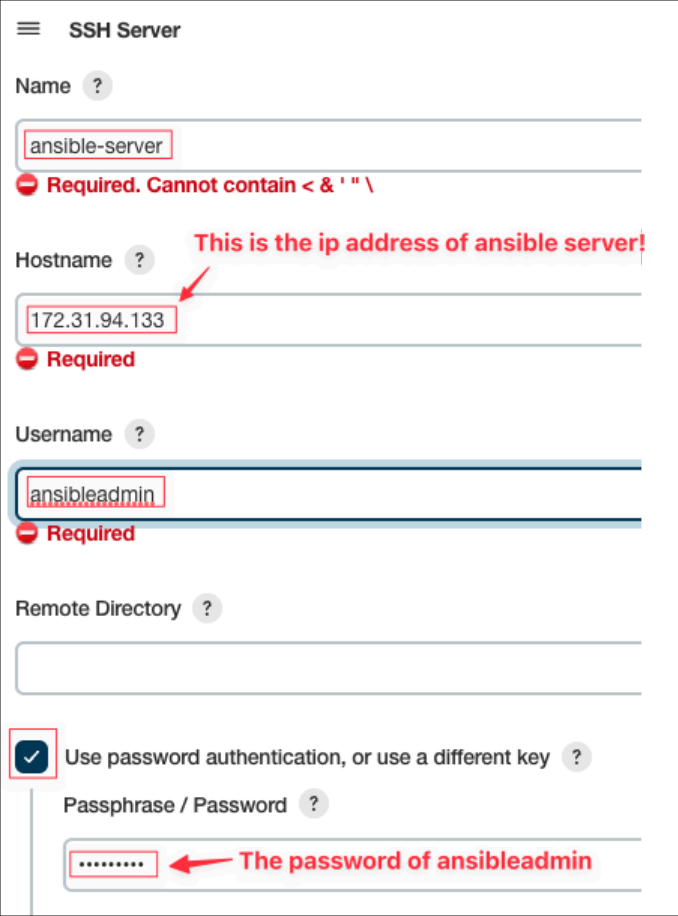
ansibleadminon the Ansible server. Use the Ansible server's private IP (172.31.x.x) so both instances are in the same VPC, and unlike the public IP it will not change when you stop and start the instance. You will be prompted for theansibleadminpassword you set in section 1b; this works because you enabled password login there.ssh-copy-id -i /root/jenkins_deploy_key.pub ansibleadmin@<Ansible-Server-Private-IP>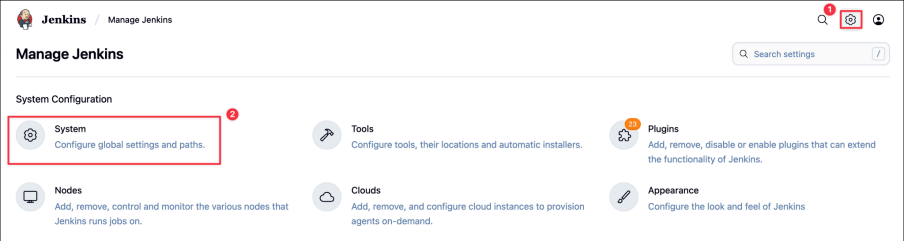
-
Verify before touching Jenkins. This should log in with no password and print the hostname and the Ansible version:
ssh -i /root/jenkins_deploy_key ansibleadmin@<Ansible-Server-Private-IP> 'hostname && ansible --version'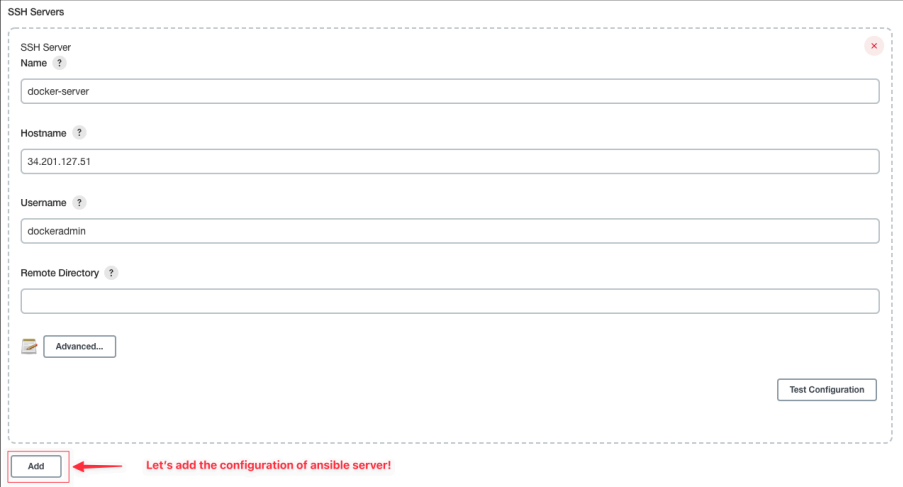
-
-
Let's add the
ansibleadminauthentication as a Jenkins credential. Go to Manage Jenkins → Credentials → System → Global credentials (unrestricted) → + Add Credentials:-
Kind: SSH Username with private key
-
ID:
ansibleadmin-key -
Description: ansibleadmin on ansible-server
-
Username:
ansibleadmin -
Private Key: Enter directly → paste the entire contents of
/root/jenkins_deploy_key, including the-----BEGIN RSA PRIVATE KEY-----and-----END RSA PRIVATE KEY-----lines. This is the same private key as thedockeradmin-keycredential — one key pair, two credentials, because the username differs. -
Passphrase: leave empty
-
Click Create
-
-
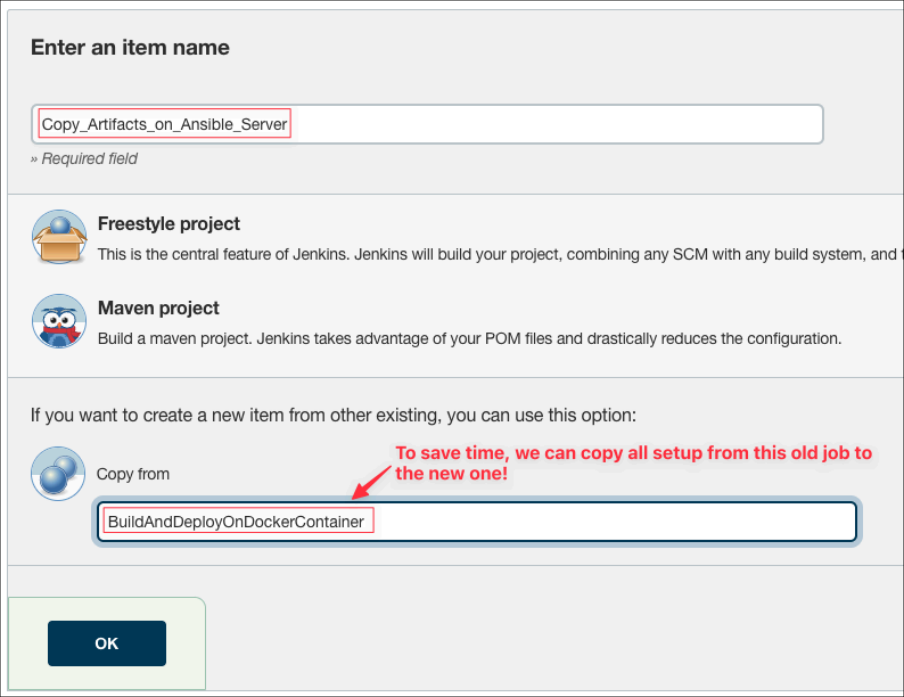
Let’s create a new Jenkins job:
-
To save time, you can copy the configuration settings from the “BuildAndDeployOnDockerContainer” job from last week.
-
-
We keep everything the same (git, github, maven, …) apart from two things in the copied job.
-
First, scroll up to Build Environment, and in the SSH Agent → Credentials dropdown change the selection from dockeradmin (
dockeradmin on docker-server) to ansibleadmin (ansibleadmin on ansible-server). -
Second, scroll down to Post Steps → Execute shell and replace the script inherited from last week's job with just the copy step for now. We will add the Ansible playbook commands later in Section 6:
ANSIBLE_SERVER=ansibleadmin@<Ansible-Server-Private-IP>
SSH_OPTS="-o StrictHostKeyChecking=no -o UserKnownHostsFile=/dev/null"

# Copy the war artifact to the Ansible server's home directory
scp $SSH_OPTS target/*.war $ANSIBLE_SERVER:/home/ansibleadmin/
Note the destination is /home/ansibleadmin, not /home/dockeradmin.
-
Let’s save the job for now! And run the job to test if the job can run correctly and copy the artifacts over to the Ansible Server!
-
The result looks good! It should show build success and successfully connect to the Ansible Server to copy the artifact WAR file over that server.
-
Note that the WAR file is sent to Ansible instead of directly to
Dockerbecause Ansible is becoming the "deployment manager" in the pipeline.
-

-
[Switch to the Ansible Server Terminal] In the Ansible Server, you can check if the WAR artifact file has been transferred from Jenkins server to Ansible Server like so:
-
Keep in mind, you might need to
cd ~to change the working directory to the home directory ofansibleadminuser first before listing the files inside it.
-
📤 4. Push the Docker image to Docker Hub
Alright, so far so good! Now, let’s install docker on the Ansible server so we can push the docker image of our web application to Dockerhub!
We can sudo into the root user or in this case, we can stay as ansibleadmin user and add “sudo” at the beginning of every command to execute them as a root user like so:
sudo yum install docker -y-
Let’s add the
ansibleadminto be in thedockergroup:-
This is necessary to run Docker commands as the
ansibleadminuser without typing sudo every time.
-
sudo usermod -aG docker ansibleadmin-
For this to take effect, please logout and login in as
ansibleadminagain:
exit
sudo su - ansibleadmin
-
We can double check if the
ansibleadminis now in thedockergroup:
id ansibleadmin
-
Let’s start the docker service:
sudo service docker start-
Let’s start the docker status:
sudo service docker status
-
Let’s create a Dockerfile to build an image from war artifact file:
nano DockerfileFROM tomcat:latest
RUN cp -R /usr/local/tomcat/webapps.dist/* /usr/local/tomcat/webapps
COPY ./*.war /usr/local/tomcat/webapps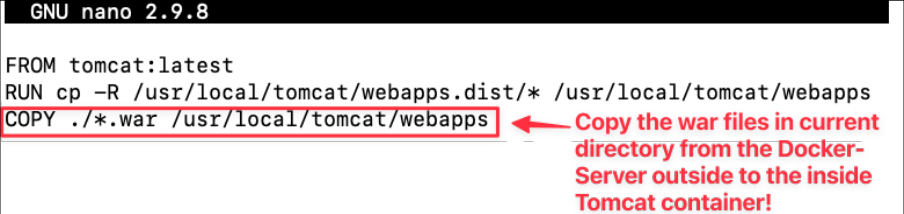
-
Let’s test if you can build a docker image from this Dockerfile:
docker build -t myapp:v1 .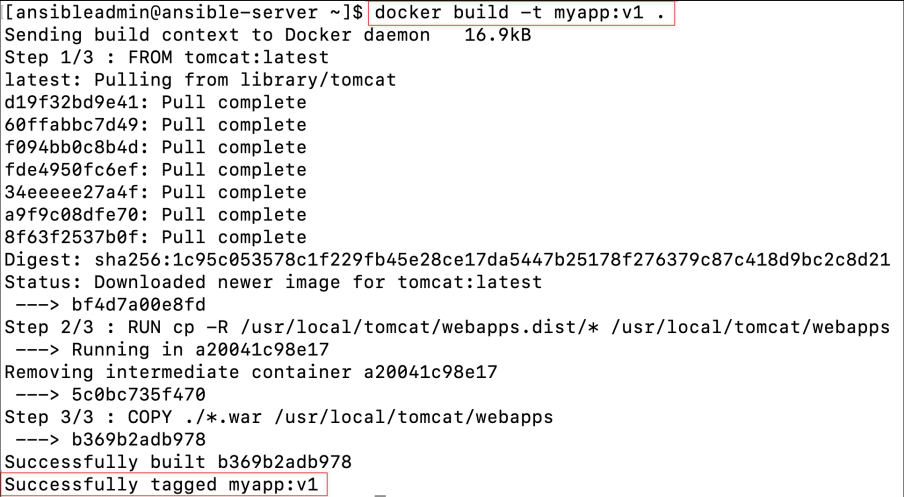
-
Let’s list all docker images to check if our new image is there:
docker images
-
We can even test further by creating a container from this image and access this image via the browser:
-
The website should be available on the browser via the Ansible Public IP address with the
port 8081.
-
docker run -d --name myapp-container -p 8081:8080 myapp:v1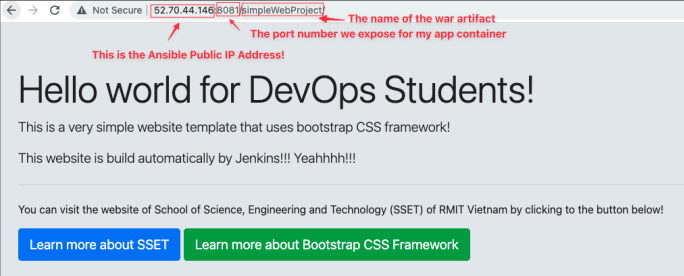
It means that our Docker image is healthy!
🔄 [Next step explanation] Add both servers to the inventory
We need to ensure the Ansible server adds both itself and the docker-server to its inventory file (/etc/ansible/hosts) for these reasons:
-
Self-Management: The Ansible server needs to manage itself to execute tasks like building
Dockerimages and pushing them toDockerHub. Adding itself to theinventoryallows it to act as a target node and executeplaybooksseamlessly. This makes the Ansible server both a controller and a worker node, which is common in small setups but in production, roles are usually separated. -
Automation: Configuration tasks on the Ansible server (e.g., installing Docker, managing services) can be automated via playbooks, ensuring consistency and efficiency.
-
CI/CDRole: The Ansible server is integral to the CI/CD pipeline:-
Builds Docker images locally.
-
Pushes images to DockerHub.
-
Hosts playbooks for managing other servers (e.g., the
docker-server).
-
Including itself in the inventory ensures Jenkins can trigger tasks like building and tagging Docker images locally, following the principle of "automate everything, even the automation server." This approach enhances consistency, reusability, and ease of management in the pipeline.
-
Let’s modify the Ansible host file (Inventory)
sudo nano /etc/ansible/hosts
[dockerserver]
private-ip-address-of-docker-server

[ansibleserver]
private-ip-address-of-ansible-server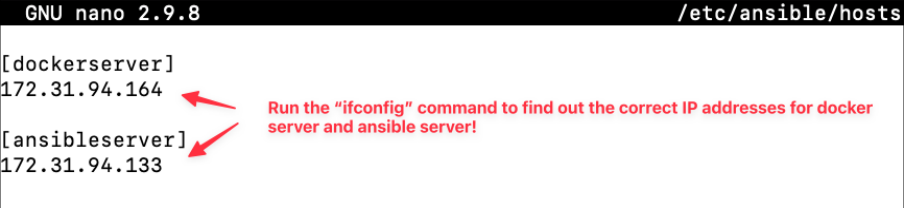
-
Now add the Ansible server's own public key to itself, so Ansible can manage the
ansible-serveras a target node too. -
This must be run as
ansibleadmin, not as root. If your prompt still shows[root@ansible-server ~]#, switch user first:
sudo su - ansibleadmin-
Confirm your prompt now reads
[ansibleadmin@ansible-server ~]$, then run:
ssh-copy-id ansibleadmin@<Ansible-Server-Private-IP>-
Enter the
ansibleadminpassword when prompted. Answeryesto the host authenticity question. -
By doing this you have copied the same public key onto both the docker server and the ansible server.
-
Let’s test the connection by running this command:
ansible all -a uptime
If you see the output of the uptime command from two servers like this, it means you have set up the correct IP addresses in the inventory so Ansible now can run commands on both servers (ansible-server - itself and docker-server - slave).
-
Let’s create an ansible
playbook:
nano buildAndPush.yml---
- hosts: ansibleserver
tasks:
- name: create docker image
command: docker build -t myapp:latest .
Note, please notice that, we will use the tag: latest to separate this docker image compared to the test image with the tag v1.
-
To run this Ansible Playbooks:
-
You should see that the playbook runs on the private IP address of ansible server (
ansibleserver), gathers system facts, and successfully builds the Docker imagemyapp:latest, completing without errors.
-
ansible-playbook buildAndPush.yml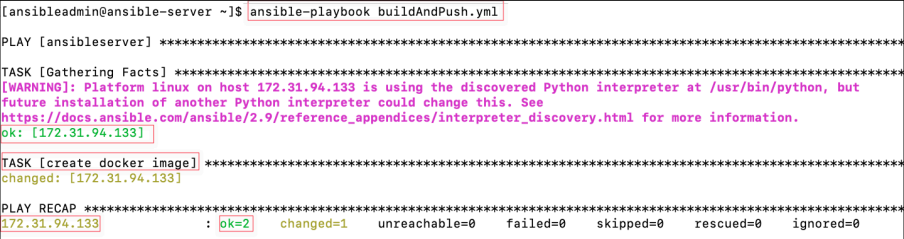
-
Let’s list all docker images:
-
You should see the new Docker image “myapp” with tag “latest” is created as the result of that playbook execution.
-
docker images
-
Login in DockerHub (https://hub.docker.com/) (create an account if you haven’t created one) and create a repository on DockerHub:
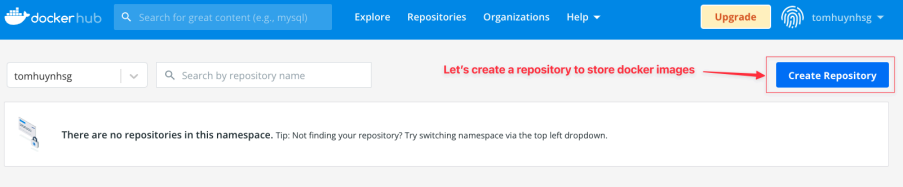
-
Create a new Docker repo with the name “myapp” with visibility “Public”:
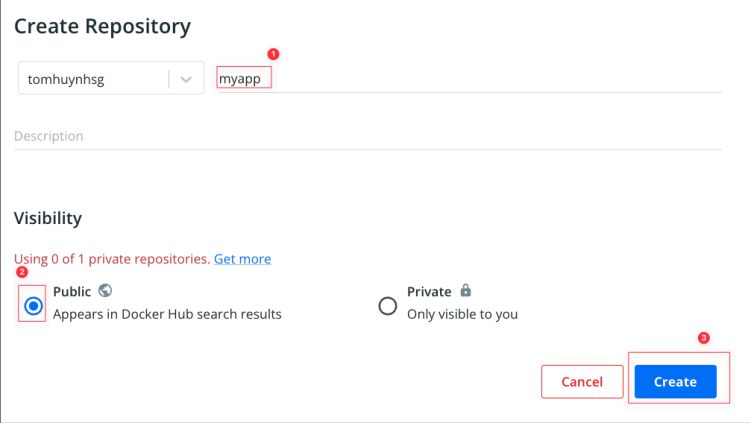
-
You should be able to confirm that repo is created correctly on Docker Hub page:

-
Now, we just need to change the docker image name to match with the pattern “
your-dockerhub-username/myapp:latest”.-
Explanation: The image name must include your Docker Hub username (or organization name) as the namespace. This ensures the image is associated with your account. Without your Docker Hub username, Docker won’t know which account the image belongs to when you push it.
-
docker tag [image-id] [new-image-repo-name]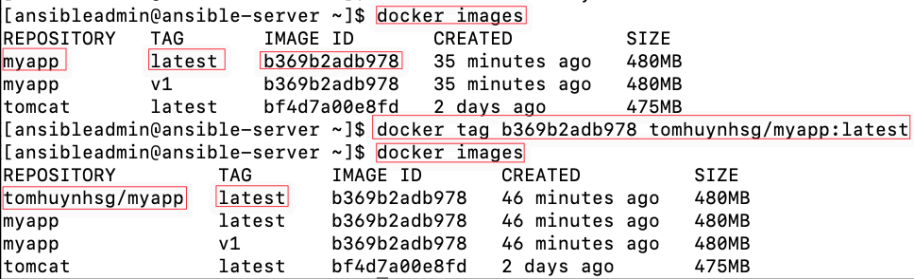
-
Let’s authenticate the docker hub with your username and password once:
docker login
-
Now, we are ready to push the docker image to the DockerHub:
docker push tomhuynhsg/myapp:latest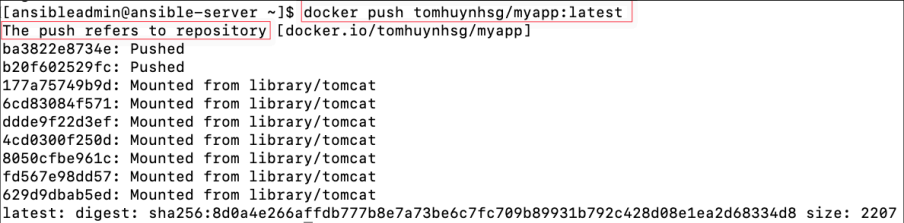
-
You can check if your image has been pushed to DockerHub by just open your repo on DockerHub:
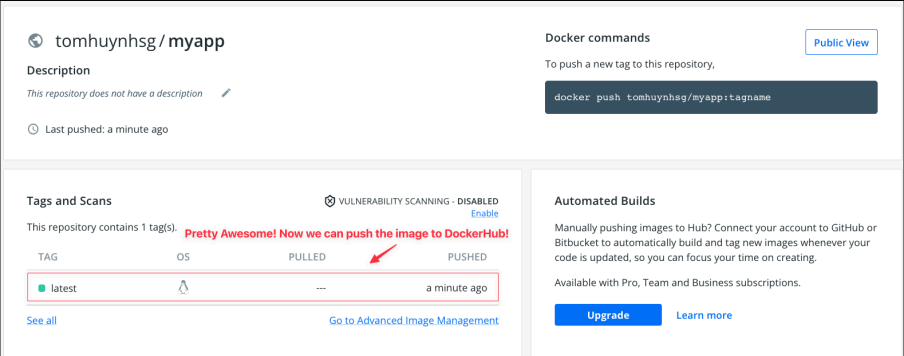
-
Let’s modify our Ansible Playbooks to add a task to push the image to Dockerhub:
nano buildAndPush.yml---
- hosts: ansibleserver
tasks:
- name: create docker image
command: docker build -t myapp:latest .
- name: create tag to push the image to dockerhub
command: docker tag myapp:latest tomhuynhsg/myapp:latest
- name: push the docker image to dockerhub
command: docker push tomhuynhsg/myapp:latest
Note, keep in mind, you need to change tomhuynhsg to be your DockerHub username.
-
Let’s test our Ansible Playbooks which create a docker image then push it to dockerhub:
-
You should see that the playbook runs on the private IP address of ansible server, gathers system facts, builds the Docker image
myapp:latest, tags it for Docker Hub, and pushes it successfully, completing with no errors.
-
ansible-playbook buildAndPush.yml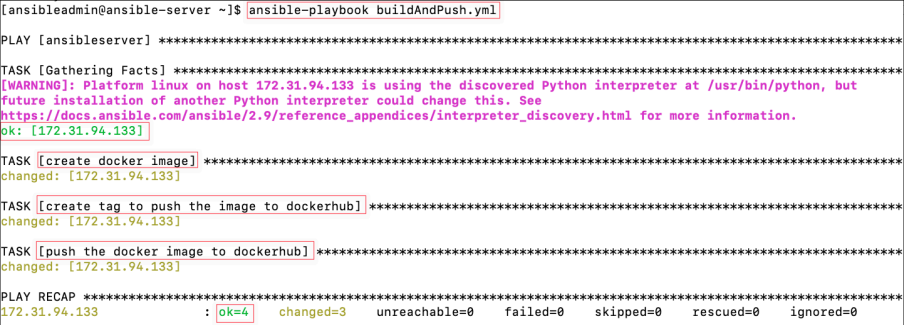
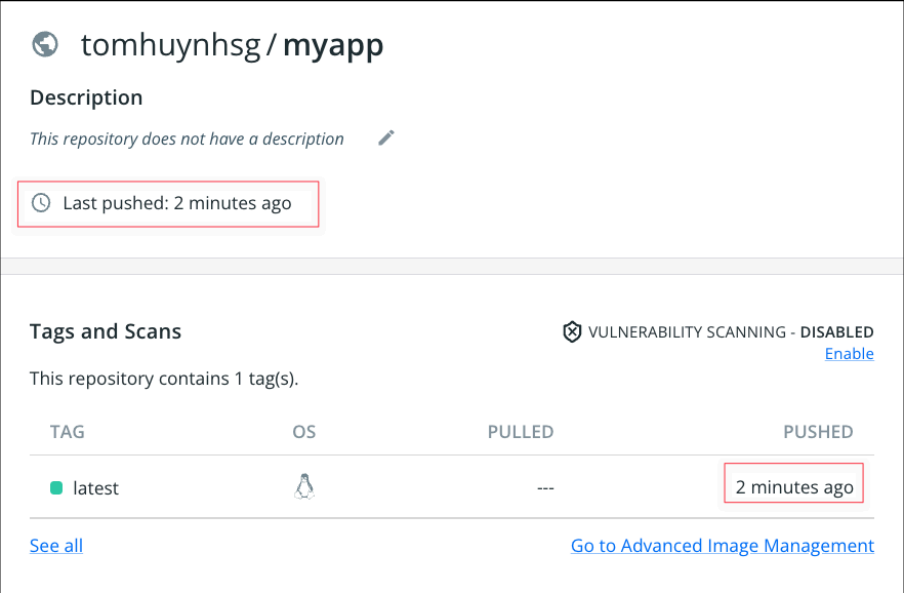
🤖 5. Create a container on Docker Server using Ansible Playbook
-
Let’s create a new
AnsiblePlaybooks to create a container by pulling it fromDockerHub:
nano pullToCreateContainer.yml---
- hosts: dockerserver
tasks:
- name: create docker container by using the image on Dockerhub
command: docker run -d --name mywebapp-container -p 8082:8080 tomhuynhsg/myapp:latest-
[Switch to Docker Server Terminal] Before running this playbook on Ansible Server, make sure Docker service is running on Docker Server:
sudo service docker start
-
[Switch to Ansible Server Terminal] Let’s run this Playbooks on Ansible Server:
-
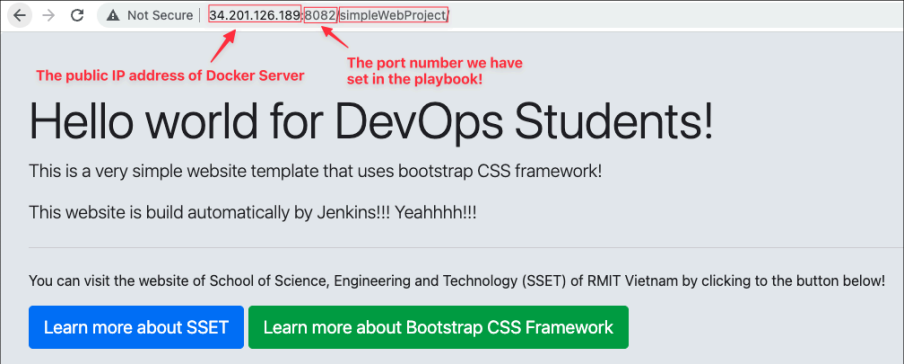
The website should be available to access on the browser on the public IP address of the Docker server with the
port 8082.
-
ansible-playbook pullToCreateContainer.yml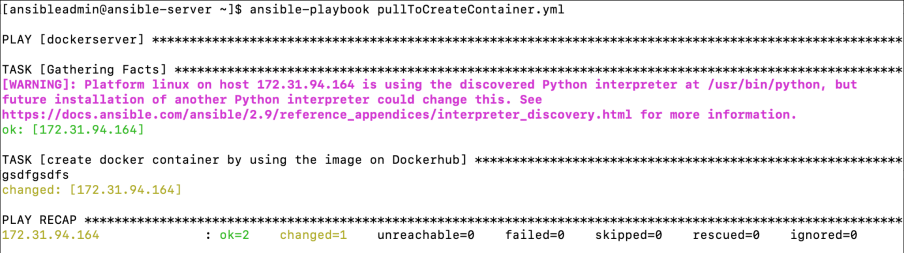
-
It's pretty good! However, to keep running the same playbook over and over again! We need:
Idempotency checkpoint: On a second playbook run, which tasks should report
changedand which should reportok? What would repeated destructive recreation reveal about the playbook design?-
Remove existing container
-
Remove existing image
-
Create new container
-
-
Let’s modify the playbook:
nano pullToCreateContainer.yml---
- hosts: dockerserver
tasks:
- name: stop the existing container
command: docker stop mywebapp-container
ignore_errors: yes
- name: remove the existing container
command: docker rm mywebapp-container
ignore_errors: yes
- name: remove the existing image
command: docker rmi tomhuynhsg/myapp:latest
ignore_errors: yes
- name: pull the latest image from dockerhub
command: docker pull tomhuynhsg/myapp:latest
- name: create docker container by using the image on Dockerhub
command: docker run -d --name mywebapp-container -p 8082:8080 tomhuynhsg/myapp:latest
[Explanation] ignore_errors: yes is needed on the stop/remove tasks in case there is no existing container or image yet as this keeps the playbook idempotent (safe to run multiple times). The docker pull task deliberately has no ignore_errors: it is the step that guarantees we are deploying the image that was just pushed. If the pull fails, we want the playbook and therefore the Jenkins build to fail loudly, rather than silently re-running yesterday's image.
-
Let’s run this Playbooks on Ansible Server again:
-
You should see that the playbook runs on the ansible server, gathers system facts, stops and removes the existing container, removes the old image, and then creates a new Docker container from the image on Docker Hub, completing successfully with no errors.
-
ansible-playbook pullToCreateContainer.yml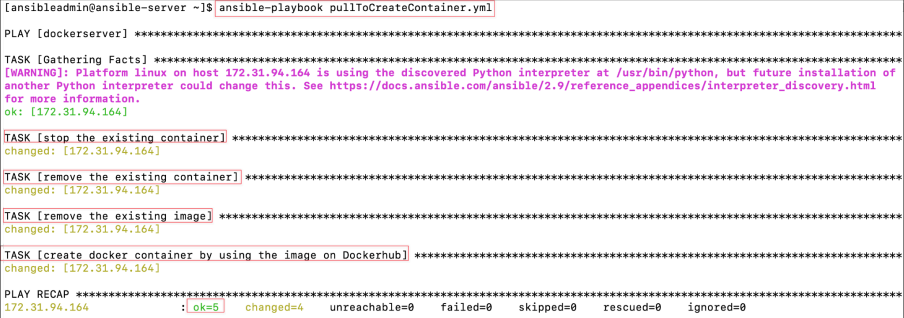
Alright, it’s perfect! Now, both of our Ansible Playbooks are ready for Jenkins to use!
Note: you can try to run this playbook pullToCreateContainer.yml many times to ensure this playbook can run multiple times without any issue. Also, the first time you run it and the next time you run it, then you might see something interesting in those runs.
🏗️ 6. Jenkins CI/CD Pipeline to deploy on a container using Ansible Playbooks
-
Open the configuration page of the
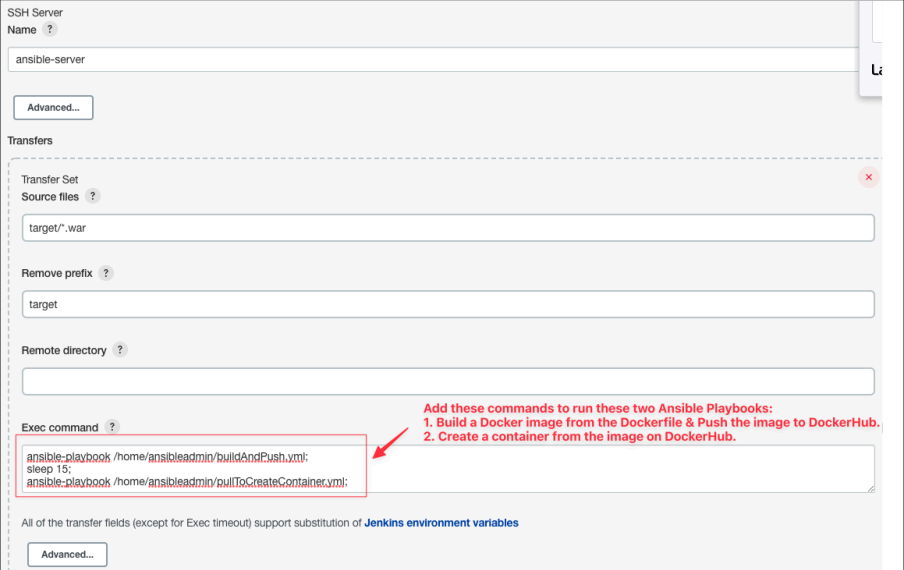
Jenkinsjob again and replace the contents of the Execute shell box (which currently holds only thescpline from section 3) with the full script below.-
First
playbook→ Builds a new container image and pushes it to the Docker Hub repo registry. -
Sleep → Pushing images to DockerHub isn’t instant, so this wait briefly (15 seconds) ensures DockerHub has the new image available before trying to pull it.
-
Second playbook → Pulls the image from the Docker Hub repo registry and creates (or updates) the running container.
set -e→ makes the shell abort at the first failing command. Without it, a failingbuildAndPush.ymlwould not stop the pipeline:sleepand the second playbook would still run,sshwould return the exit code of the last command only, and Jenkins would mark a broken deployment as SUCCESS. The innerset -eprotects the remote command list; the outer one protects thescp.
-
Note: this separation (build & push vs pull & run) mirrors real-world pipelines as it builds artifacts in one stage and deploys in another.
Release checkpoint: If deployment fails after an image is pushed, which immutable artifact lets you roll back reliably? Why is reusing only the latest tag risky?
ANSIBLE_SERVER=ansibleadmin@<Ansible-Server-Private-IP>
SSH_OPTS="-o StrictHostKeyChecking=no -o UserKnownHostsFile=/dev/null"

set -e

# Copy the war artifact to the Ansible server's home directory
scp $SSH_OPTS target/*.war $ANSIBLE_SERVER:/home/ansibleadmin/

# Run the two Ansible playbooks remotely
ssh $SSH_OPTS $ANSIBLE_SERVER '
set -e
cd /home/ansibleadmin
ansible-playbook /home/ansibleadmin/buildAndPush.yml
sleep 15
ansible-playbook /home/ansibleadmin/pullToCreateContainer.yml
'-
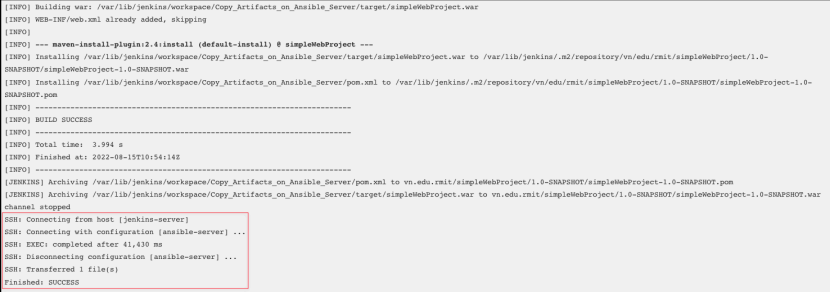
Try to run the Jenkins job to test if our configuration is all good!
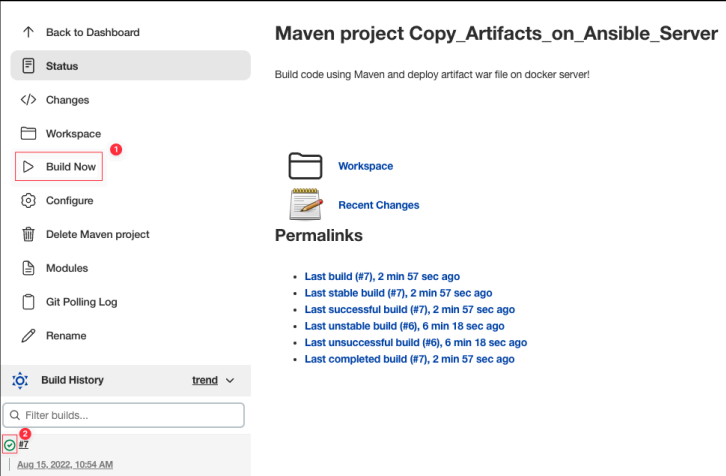
-
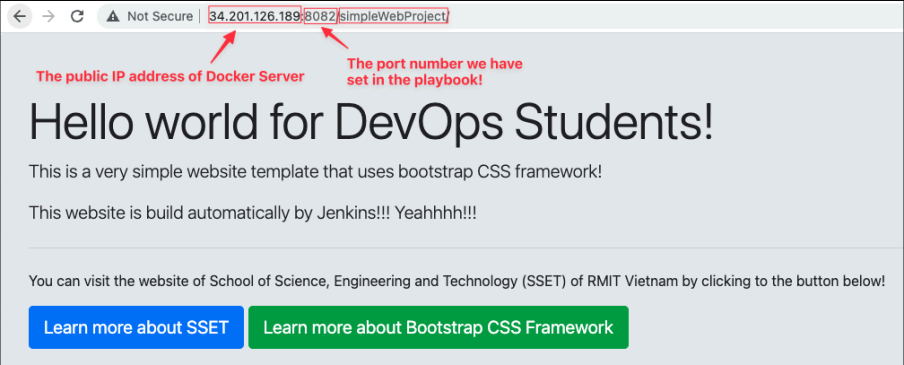
Please confirm that the website is available to access on the browser via the public IP address of
DockerServer via theport 8082(as defined in thepullToCreateContainer.ymlplaybook so feel free to change the port if you want to)
-
Also, if you want to do further testing, you could try to push some changes to trigger the Jenkins job to see if the
Ansibleplaybooksexecute correctly to show the website with the new changes or not!
Awesome, you have completed this CI/CD Pipeline for this week! Please continue to test this pipeline further by making a change to the website and push it to Github to see the full automation in action!
Congratulations! You have successfully created this CI/CD Pipeline with Ansible Playbooks! Now, by adding more IP addresses/domain names into the Ansible Inventory, you can easily manage to deploy this web application to hundreds of different target servers!
You are now ready to receive a DevOps champion award in automation 🏆!
🧪 Challenge Exercise: Automating Ansible Slave EC2 Node Setup with AWS EC2 User Data
Using AWS EC2 User Data, you can automate the initial setup of an Ansible Slaves EC2 instance when it is launched. This allows you to configure servers without manual intervention with the benefits:
-
Repeatability: Every instance launched with the script has a consistent configuration.
-
Scalability: The same script can initialize dozens or hundreds of servers.
-
Automation: Reduces manual setup, saving time and minimizing errors.
Here's a step-by-step guide:
-
Launch an Ansible Slaves EC2 Instance with User Data
-
OS: default Amazon Linux 2023 AMI (Free-tier)
-
Instance Type: t3.micro (Free-tier)
-
Key pair: select and reuse your old key in other labs (
devops_project_key) -
Storage: Default 8 GB is plenty enough!
-
Security Group:
-
Optional Name:
Jenkins_Slave_Security_Group -
Source Type: Anywhere
-
Open ports:
-
22 for
SSH -
Open other necessary ports (e.g., 8080 for
Docker).
-
-
-
Add User data
-
Click on Advanced details
-
-

-
Upload or paste in the User data:
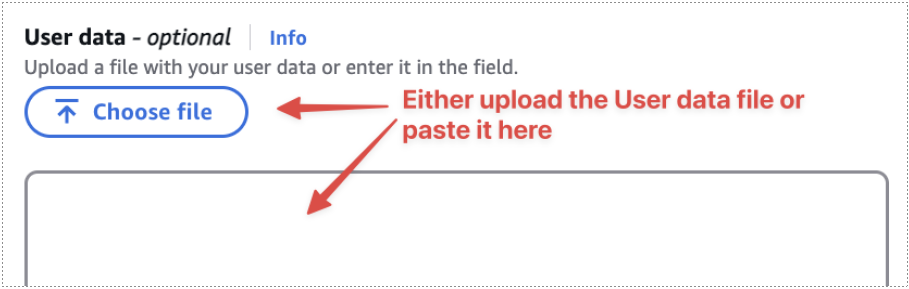
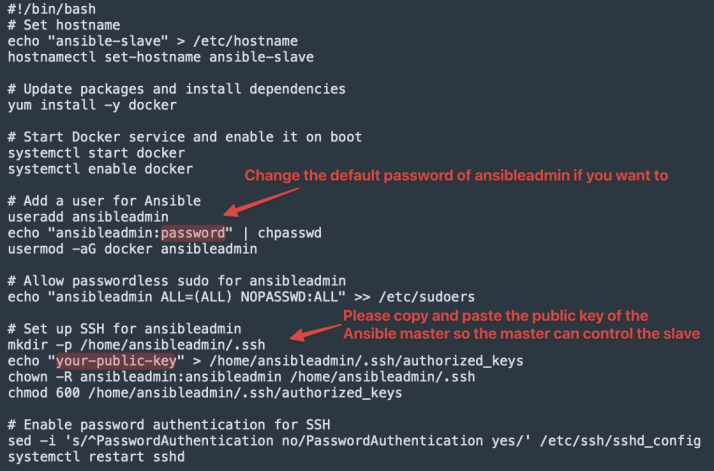
-
Note: remember that the public key of the Ansible master server should be at
/home/ansibleadmin/.ssh/id_rsa.pub-
After setting up the User data, you can launch the Ansible slave instance.
-
Wait for the instance is ready:
-

-
[Optional] For testing if your user data script working correctly, you can choose to ssh to the Ansible slave to run these commands:
-
Check the hostname is correct:

-
Test Docker:
docker --version -
Test Ansible user login:
su - ansibleadmin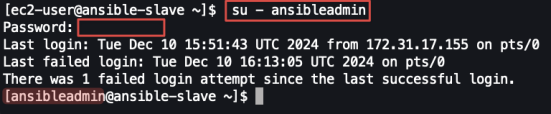
-
Confirm SSH keys to match the public key in User data:
cat /home/ansibleadmin/.ssh/authorized_keys
-
-
[Back to the Ansible Master] Add the Ansible Slave instance to the Ansible
inventoryin the Ansible master (/etc/ansible/hosts)
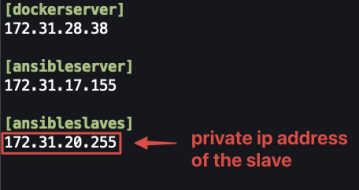
-
Test if the master can connect to the slave
ansible ansibleslave -m ping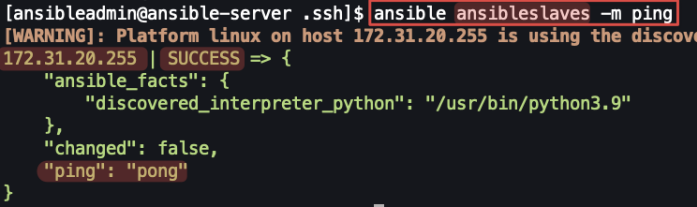
-
Test if the master can run commands on the slave:
ansible ansibleslaves -a uptime
Success! Using EC2 User Data is very efficient to quickly set up multiple Ansible slave EC2 instances for Ansible master to manage them.
[Extra thoughts]
If you would like to be more efficient to launch EC2 instances without GUI, you might consider:
-
You can launch an EC2 instance directly from the AWS CLI by passing the User Data script.
-
Save the User Data script to a file, e.g.,
user-data.sh. -
Use the following CLI command to launch the instance:
-
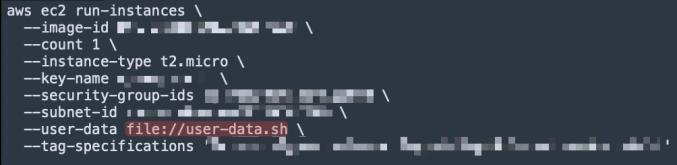
This approach aligns with real-world industry practices, enabling efficient and scalable infrastructure management.
🚀 Advanced Challenge: Expand Your Automation Skills
Now that you have a solid understanding of AWS CLI, EC2 User Data, and Ansible, here are some advanced tasks to further enhance your skills:
-
Scale Up with Multiple Ansible Groups:
-
Use the AWS CLI to quickly launch multiple EC2 instances, for example:
-
A group for test-servers (staging environment).
-
A group for production-servers.
-
-
Configure your
/etc/ansible/hostsfile to manage these groups separately:-
Note: your groups can have more ip addresses for more EC2 instances if you want to.
-
[test-servers] 192.168.x.x [production-servers] 192.168.y.y-
This separation enables precise control and testing before deploying changes to production.
-
-
Deploy Applications with
Jenkinsand Ansible:-
Use Jenkins to integrate your
CI/CDpipeline with Ansible'sinventorygroups:-
First, deploy your application to test-servers.
-
Run some basic front-end tests using tools like curl to ensure the deployment is functional.
-
Once tests pass, automate the deployment to production-servers.
-
-
-
Automate Testing:
-
Implement Ansible tasks or
playbooksto:-
Verify that the application is running on test servers.
-
Use simple health checks (curl or HTTP status checks) to confirm that the deployed app responds as expected.
-
-
-
Leverage AWS CLI for Instance Management:
-
Automate instance creation with the following AWS CLI command:
aws ec2 run-instances --image-id ami-xxxxxx --count 3 --instance-type t3.micro --key-name devops_project_key --security-group-ids sg-xxxxxx --user-data file://user-data.sh-
This ensures repeatable infrastructure setup and avoids reliance on manual GUI interactions.
-
-
End-to-End Pipeline Simulation:
-
Push a new version of your web app to GitHub.
-
Trigger a Jenkins pipeline that:
-
Builds and pushes a
Dockerimage. -
Deploys the image to test-servers via Ansible.
-
Runs tests on test-servers.
-
Upon successful tests, deploy to production-servers.
-
-
-
[Optional - Thoughts] Experiment with Advanced Tools to Simulate Real-World Scenarios:
-
Practice a blue-green deployment strategy:
-
Deploy the new version of the app to a group (e.g., test-servers or a subset of production-servers).
-
Perform tests before switching traffic over to the updated servers with AWS Elastic Load Balancer (ELB) which we will learn later in later weeks.
-
-
By practicing these advanced challenges, you'll gain deeper insights into DevOps workflows and be well-prepared for real-world scenarios involving scalable infrastructure and efficient automation. Keep pushing boundaries, and you'll be ready to tackle increasingly complex projects with confidence! 🏆